Table of Contents
Creating a certificate signing request
The following sections describe two ways in which this can be done in a Windows environment. Choose the one that suits you better and follow the steps below.
Using the Microsoft Management Console
1. First, prepare a location on your computer where you can later save the certificate request created in the next steps of these instructions. We recommend that you create a folder named "bapcrt" at "Computer" → "Local Disc (C :)". The example below shows the folder "bapcrt" created in an analogous location at "This PC" → "Windows (C :)".
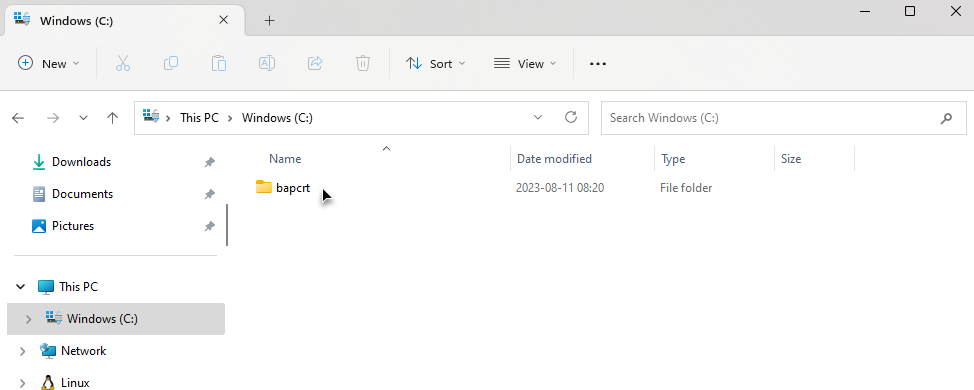
Picture 1. Creating the bapcrt folder
2. To open the user certificates manager, type "certificates" in the "Windows Start" bar to search for and choose "Manage user certificates".
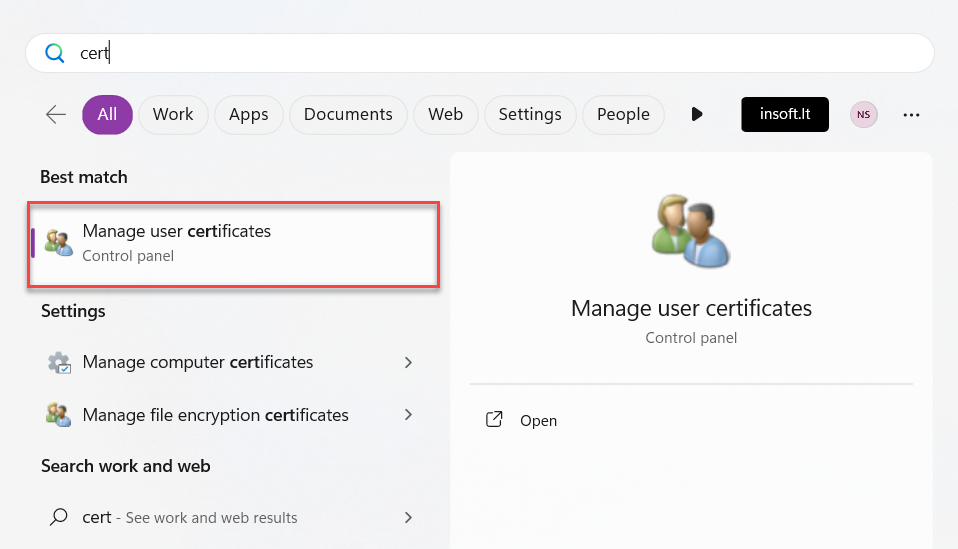
Picture 2. Search in Windows Start bar
3. Right-click on "Personal" catalog to bring up the internal menu. From this menu, select "All Tasks" → "Advanced Operations" → "Create custom request".
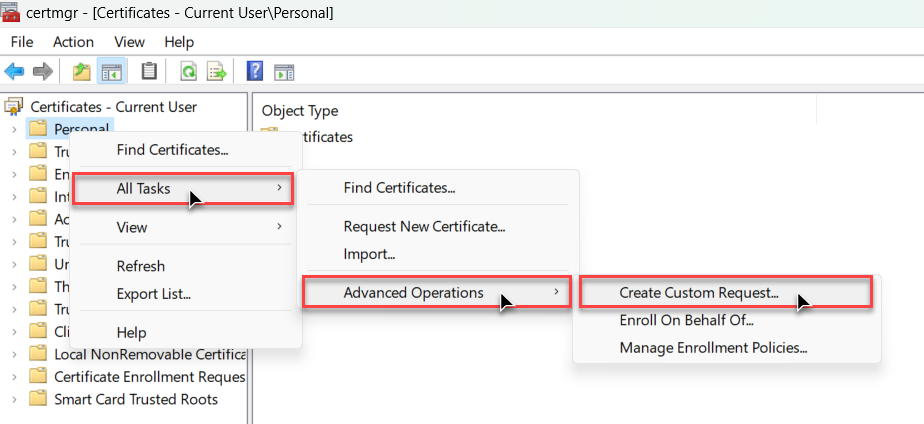
Picture 3. Manage user certificates window
4. In opened "Certificates Enrollment" window click "Next".
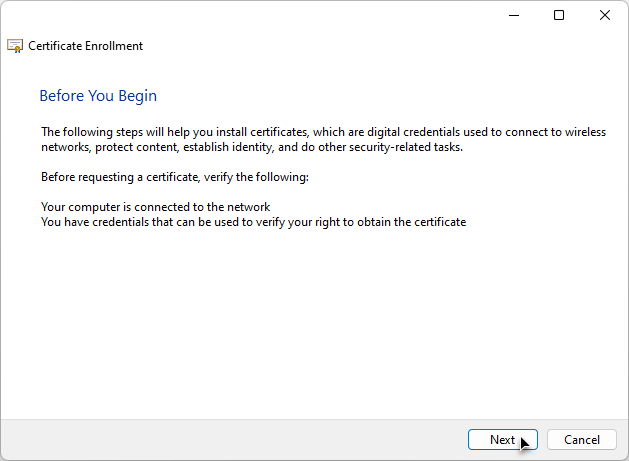
Picture 4. Certificate Enrollment window
5. The next window will suggest a strategy for applying the certificate. In "Custom Request" select "Proceed without enrolment policy" and click "Next".
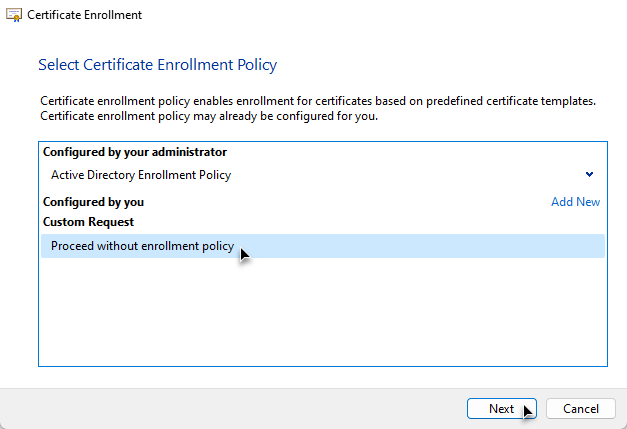
Picture 5. Strategy selection window
6. In the next step expand "Template" dropdown meniu and select "(No template) Legacy key". Note the format "PKS # 10" and click "Next".
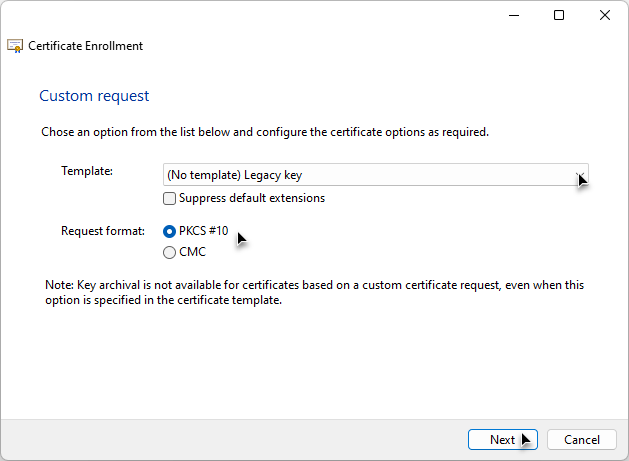
Picture 6. Template selection
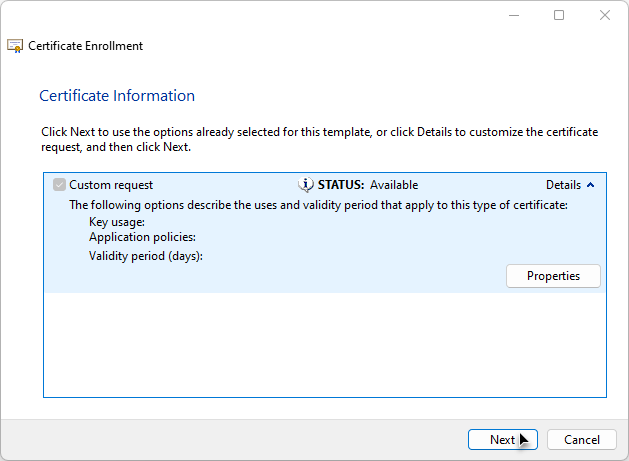
7. In the certificate information window, expand the "Details" and click the "Properties" button.
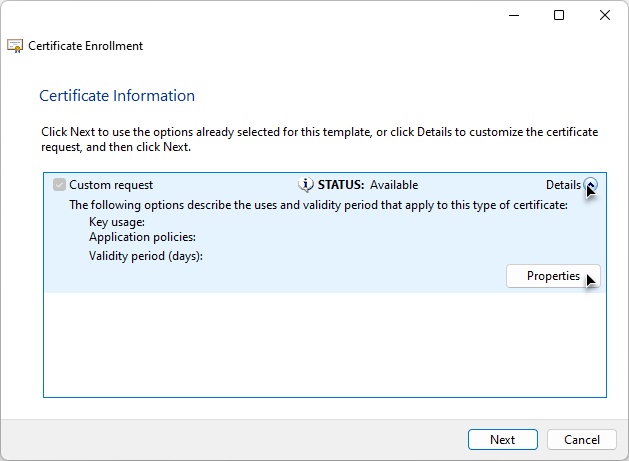
Picture 7. Certificate Information Window
8. Select the "Subject" tab in an opened window.
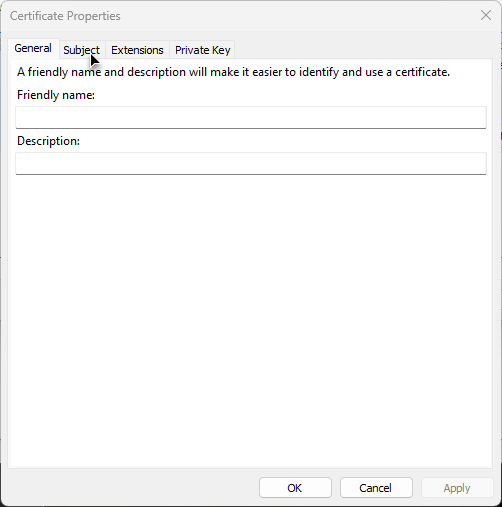
Picture 8. Subject tab
9. In the "Type" dropdown menu select "Common name".
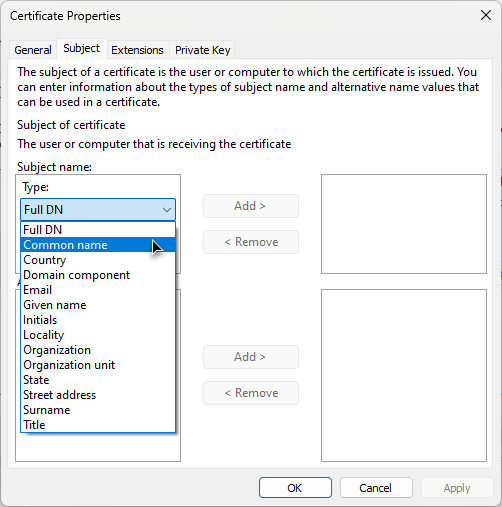
Picture 9. Subject name type selection
10. In the "Value" field enter your Name and Surname and click Add>.
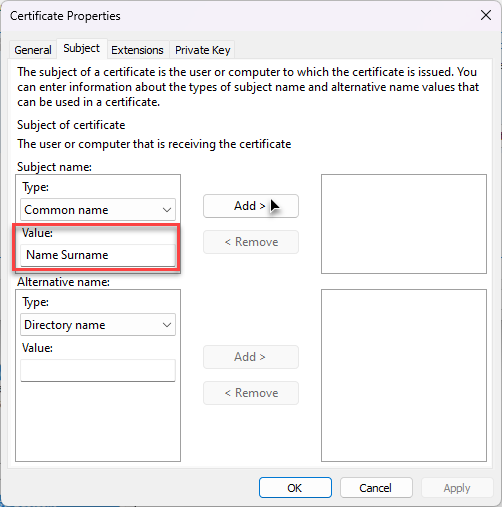
Picture 10. Subject name value
11. In the "Type" dropdown menu select "Given name", in "Value" field enter your name and click "Add>".
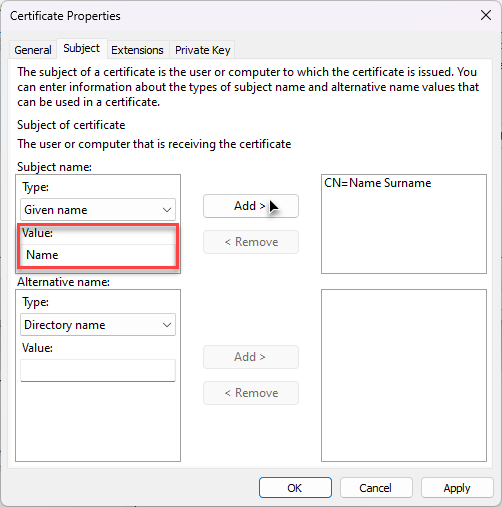
Picture 11. Filling in subject data
12. In "Type" dropdown menu select "Surname", in "Value" field enter your name and click "Add>".

Picture 12. Filling in subject data
13. When the "Subject name" values are filled in you can see them on the right pane with attributes CN, G, SN.
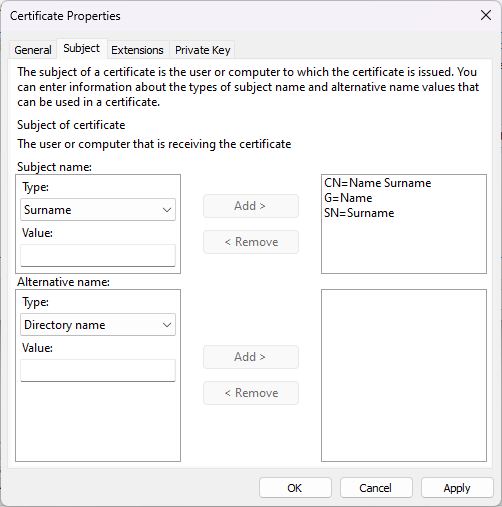
Picture 13. Subject name result
14. In the "Alternative name" section select "Email" from "Type" dropdown menu, enter your email address in "Value" field and click "Add>".
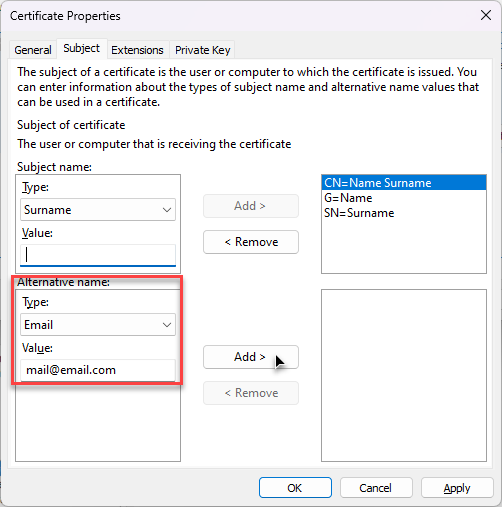
Picture 14. Alternative name data
15. When the "Alternative name" value is filled in you can see email attribute on the right pane.
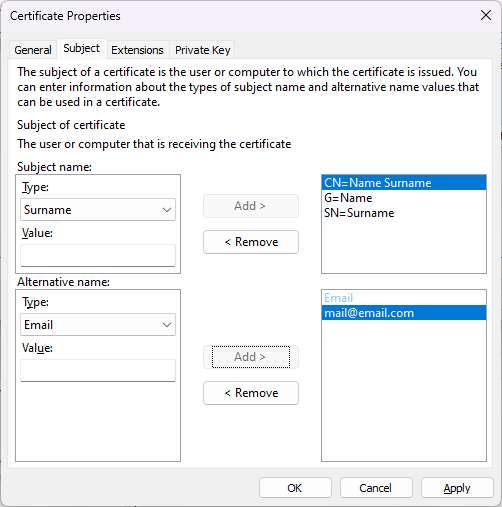
Picture 15. Alternative name result
16. Select "Private Key" tab section.
Picture 16. Private key tab selection
17. Expand the "Key type" area and select the "Exchange" option.
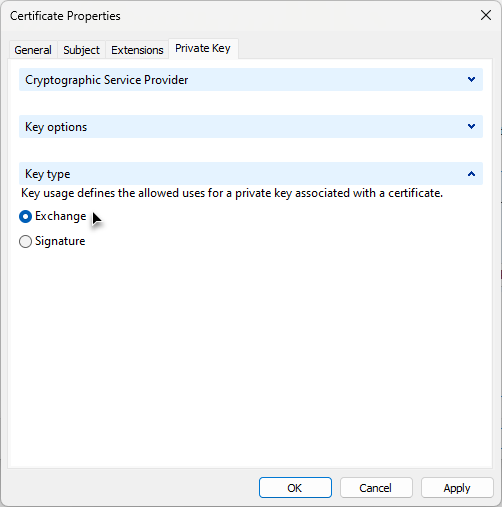
Picture 17. Key type selection
18. Once you have selected the key type, you need to choose which algorithm is used to encrypt the data. To do this, expand the "Cryptographic Service Providers" section and make sure that only one option "Microsoft RSA SChannel Cryptographic Provider (Encryption)" is selected.
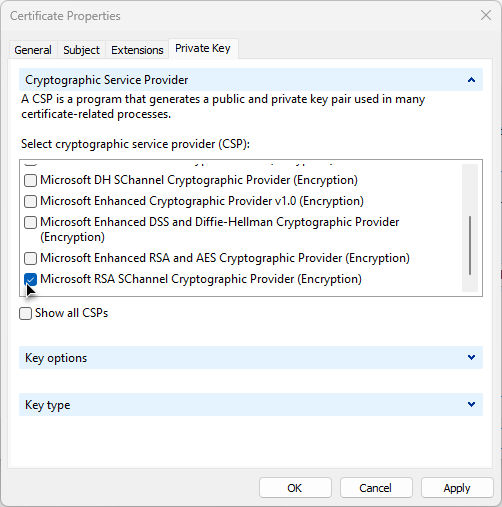
Picture 18. Encryption algorithm selection
19. Finally, you need to specify the key size by expanding the "Key options" section, selecting "2048" next to Key size and marking the "Make private key exportable" checkbox.

Picture 19. Key size selection
20. After completing all the above steps, click on the "OK" button and you will be returned to the "Certificate Enrollment" wizard.

Picture 20. Certificate properties window closing
21. In "Certificate Enrollment" wizard click "Next" button.
Picture 21. Certificate Enrollment wizard
22. The next step is to specify the disk location where you want to save the certificate request. To do this, click on the "Browse..." button.
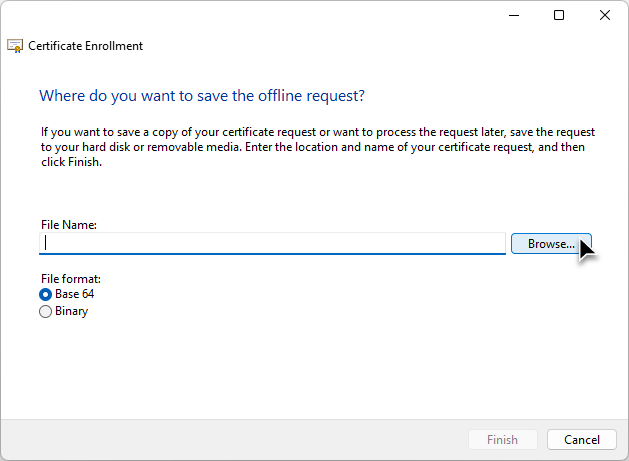
Picture 22. Query save dialog
23. Select where you want to save the file.
Note
It is recommended to store the file in the directory "bapcrt" created at the address given in step 1.
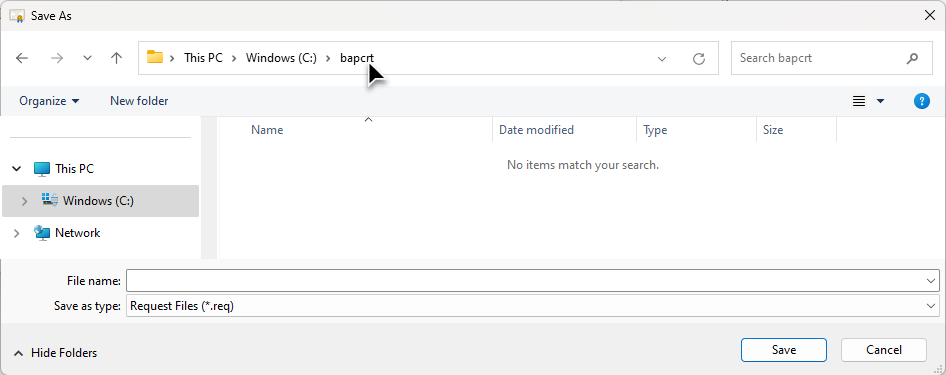
Picture 23. File save dialog
24. It's important to save a file with a "csr" extension - to do this, add ".csr" ending to the file name and specify "All files (*. *)" option in the "Save as type" field. Click "Save" in the dialog box after completing all the steps.

Picture 24. File save dialog
25. You will be returned to the "Certificate Enrolment" wizard. Click the "Finish" button. The CSR has been generated successfully and saved to the file you specified.
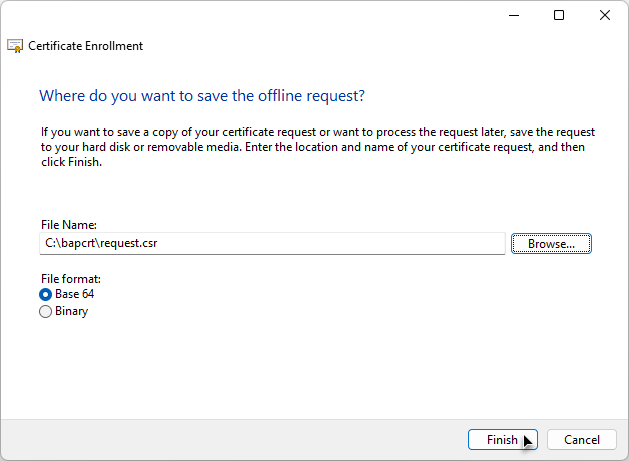
Picture 25. End of the wizard
Note
Continue generating the certificate from the "Download and install the certificate" chapter.
Using Command Prompt
1. Create a "request.inf" file. The contents of the file are listed below.
Note
You can download the prepared "request.inf" file in the certificate generation window or on the login page.
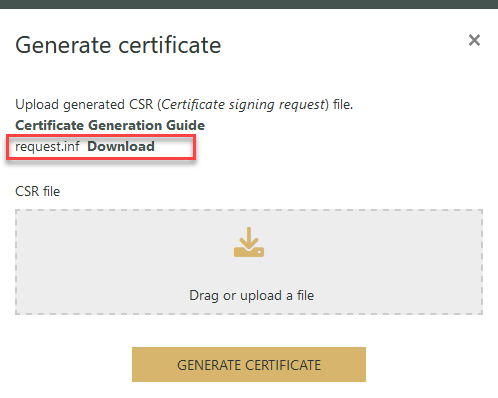
Picture 26. Download of the request.inf file for authenticated BAP user
After downloading the file, please enter your full name (CN, G, SN) in the "Subject" line instead of "Name Surname" and your email address in the "_continue_" line.
;----------------- request.inf -----------------[Version]Signature="$Windows NT$" [NewRequest]Subject = "CN=Name Surname, G=Name, SN=Surname"KeySpec = 1KeyLength = 2048Exportable = TrueMachineKeySet = FalseSMIME = FalsePrivateKeyArchive = FALSEUserProtected = FALSEUseExistingKeySet = FALSEProviderName = "Microsoft RSA SChannel Cryptographic Provider"ProviderType = 12RequestType = PKCS10KeyUsage = 0xa0[Extensions]2.5.29.17 = "{text}"_continue_ = "email=email@example.com"[EnhancedKeyUsageExtension]OID=1.3.6.1.5.5.7.3.1;-----------------------------------------------Note
If you have not used the BAP system before and do not have the possibility to log in via the eGovernment Gateway, please see the section "Download and install the certificate".
Important
When saving the file "Encoding" must be selected "ANSI".

Picture 27. Choosing a file encoding
2. Open the "cmd" command line. To do this, type "cmd" in the address bar of the current "bapcrt" folder and press the "Enter" key on your keyboard.
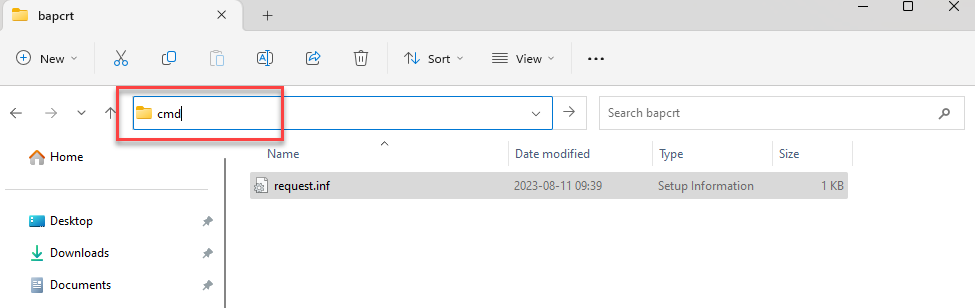
Picture 28. Opening CMD through the address bar

Picture 29. CMD line window
3. In the opened window, enter the following command:
C:\bapcrt> certreq -new request.inf request.csr
Picture 30. Example of command entry
After successfully creating "request.csr", you will receive a response from the command line:
CertReq: Request Created
Picture 31. Response
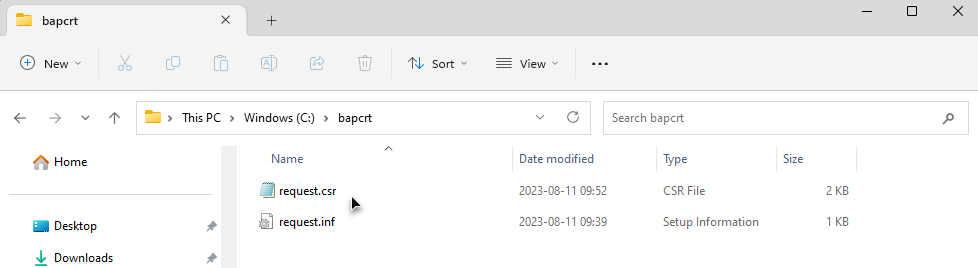
Picture 32. Creating a file request.csr
Certificate download and installation
1. If you have not used the BAP system before and do not have the possibility to log in via the Electronic Government Gateway, please send the prepared "request.csr" file by email to the customs office when requested. You will receive a reply with the sertifikatas.crt attached file, which you should save in the "bapcrt" directory you created.
If you can log in to BAP using the authentication service provided by the Electronic Government Gateway, or if you have already used the BAP system in the past and you are able to login to it, click on the "+Add New" button in the "Profile" section, select the value "Certificate issued by the customs of the Republic of Lithuania - for connecting to customs portals and accessing customs system to system services." in the "Adding a new certificate" modal window, then click on the "Continue" button.
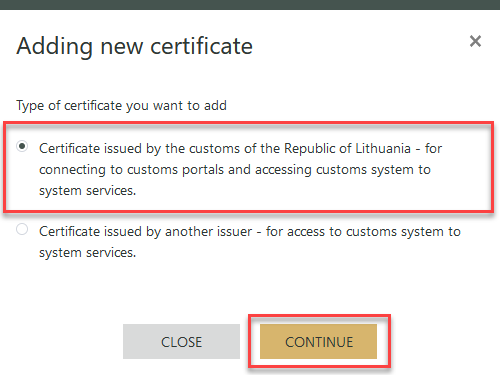
Picture 33. "Certificate issued by the customs of the Republic of Lithuania" selection
Bookmark the file "request.csr" in the "Generate Certificate" window and click on the "Generate Certificate" button.
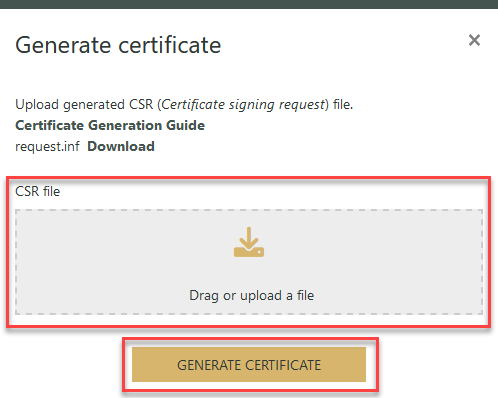
CSR file upload location
Picture 34. Uploading the CSR file
Download the "sertifikatas.crt" file by clicking the "Download" button in the pop-up window or in the certificate data table. Move the downloaded file to the "bapcrt" directory.
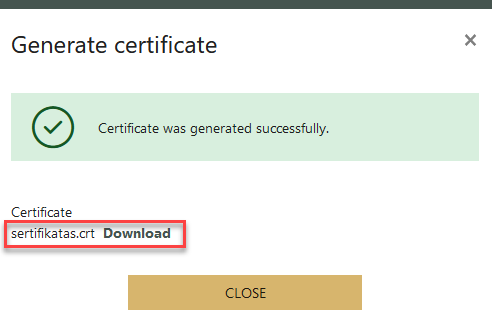
Picture 35. Downloading the CRT file
Note
The certificate can also be downloaded from the "Profile" certificate list by selecting the row of the certificate entry in the list and clicking the "Download" button. For more information see "Generating and adding a certificate after logging into the portal".

Picture 36. Creating sertifikatas.crt file
2. Import the certificate into the user certificate cache. Right-click on the "sertifikatas.crt" file and select "Install Certificate" in the pop-up window that opens.
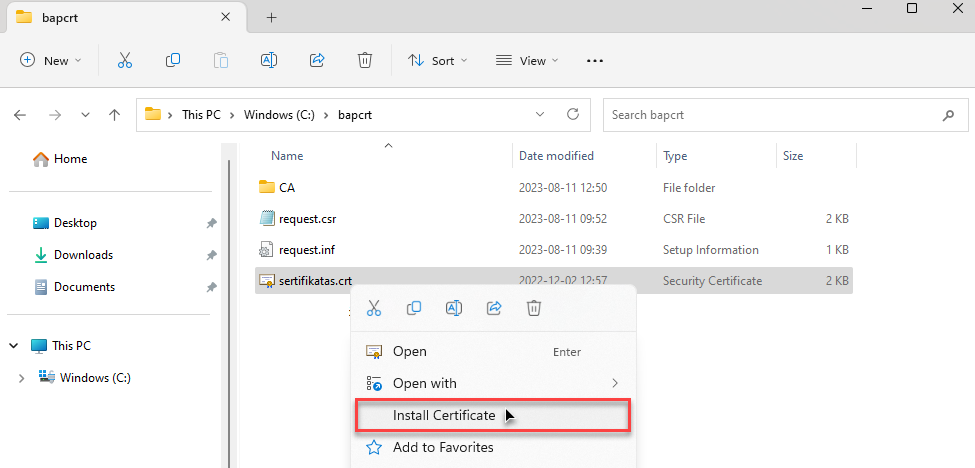
Picture 37. Importing a certificate into the user certificate cache
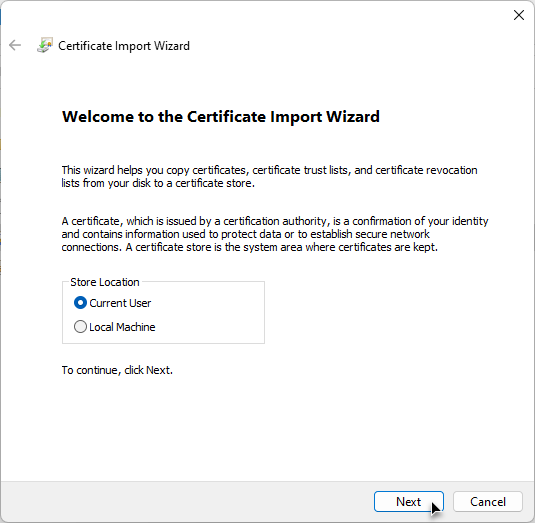
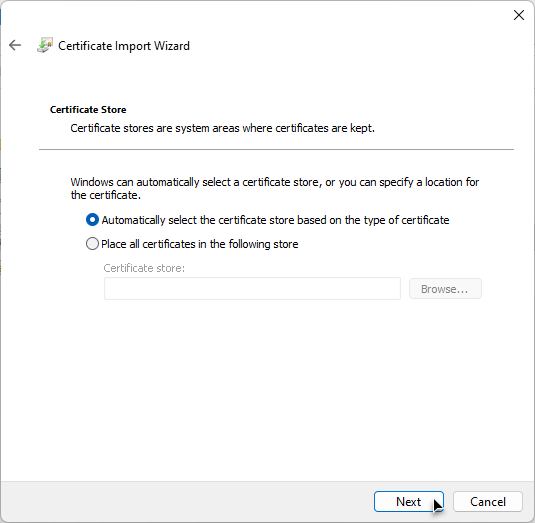
Picture 38. Certificate Import Wizard: placement location selection
Picture 39. Certificate Import Wizard: specifying the location
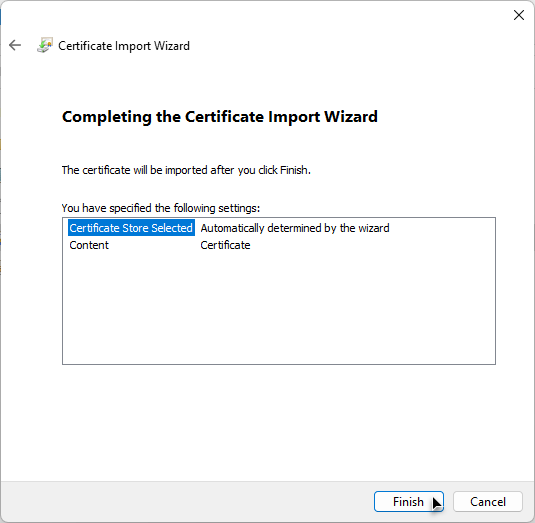
Picture 40. Certificate Import Wizard: Reviewing settings
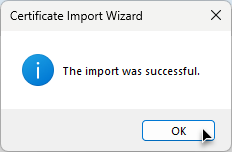
Picture 41. Certificate Import Wizard: notification of the successful completion of a certificate import
Preparing a certificate to run on another computer
1. To open the user certificates manager, type "certificates" in the "Windows Start" bar to search for and choose "Manage user certificates".
Picture 42. Search in the Windows Start bar
You should see the imported certificate in the "Certificates" directory.

Picture 43. View the imported certificate
6. Check that the certificate has the appropriate private key. If you double left-click on the certificate, you should see "You have a private key that corresponds to this certificate".
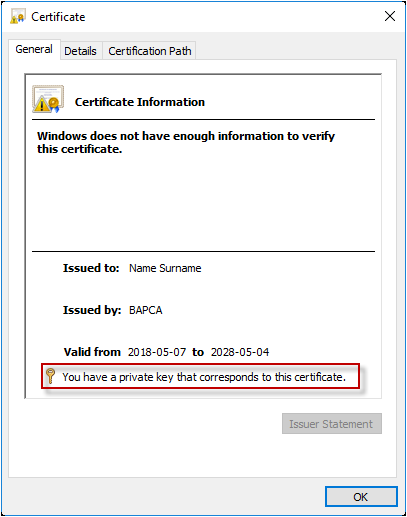
Picture 44. Certificate private key verification
7. Export the certificate along with the private key to a file so you can use it on other computers and have a backup:
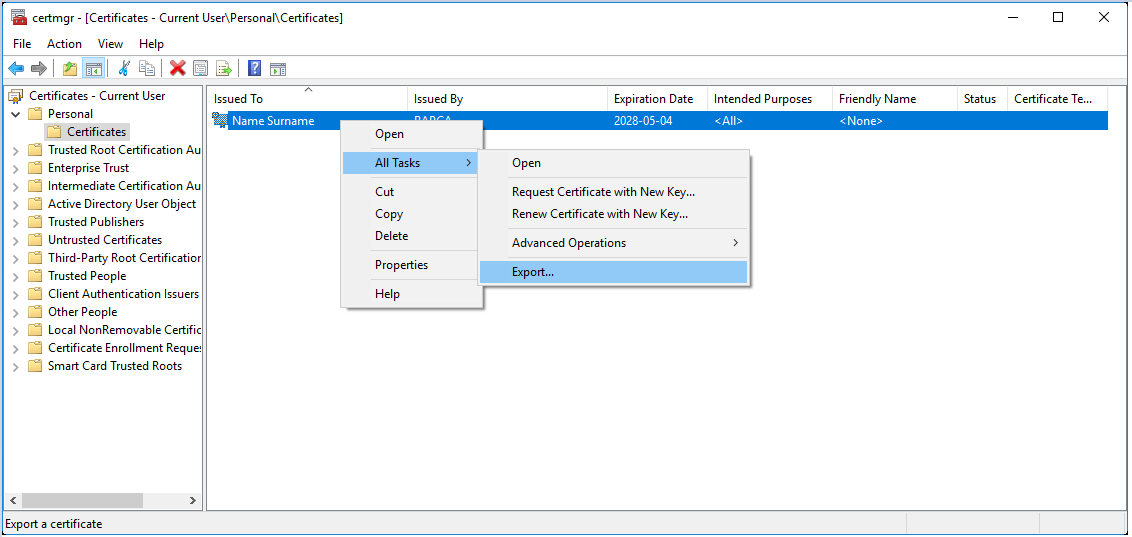
Picture 45. Certificate Export
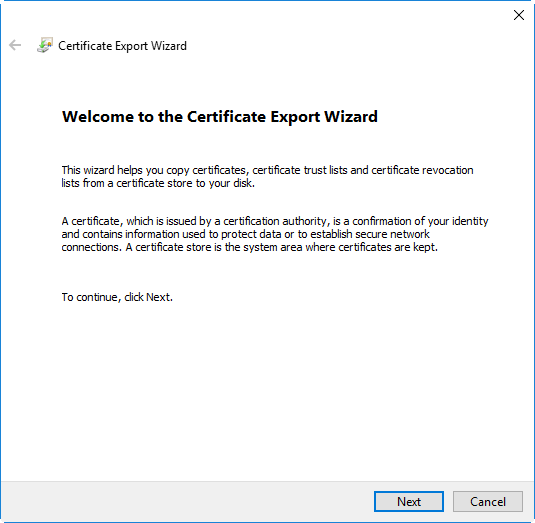
8. In the "Certificate Export" wizard, click the "Next" button.
Picture 46. Certificate Export Wizard
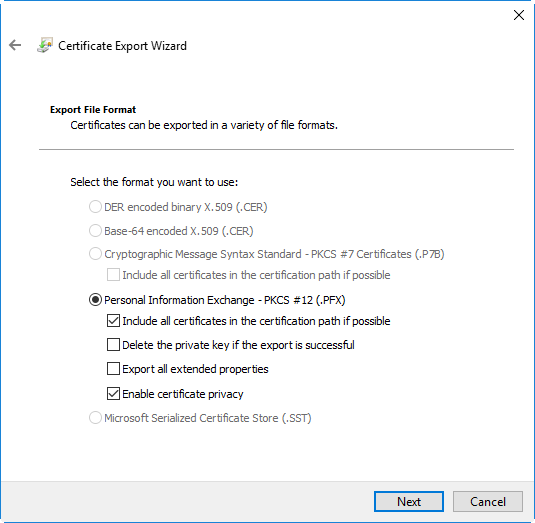
9. Mark "Personal Information Exchange - PKCS #12 (.PFX)", mark checkbox "Include all certificates in the certification path is possible" and "Enable certificate privacy" and click "Next".
Picture 47. Certificate Export Wizard: Format selection
10. Select "Yes, export the private key" to export the private key together with the certificate and click "Next".
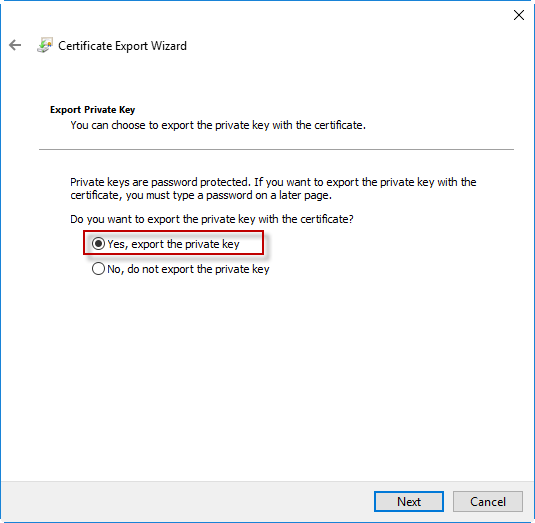
Picture 48. Certificate Export Wizard: Exporting a private key
11. Create a password that will protect the private key of the certificate and click "Next".
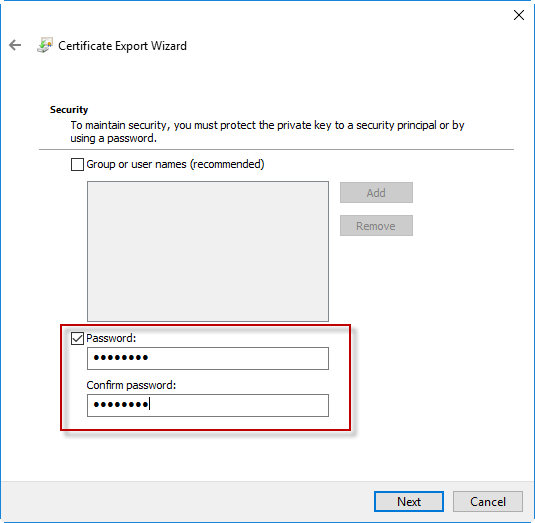
Picture 49. Certificate Export Wizard: Creating a password
12. Specify the export location and file name through "Browse..." function and click "Next".
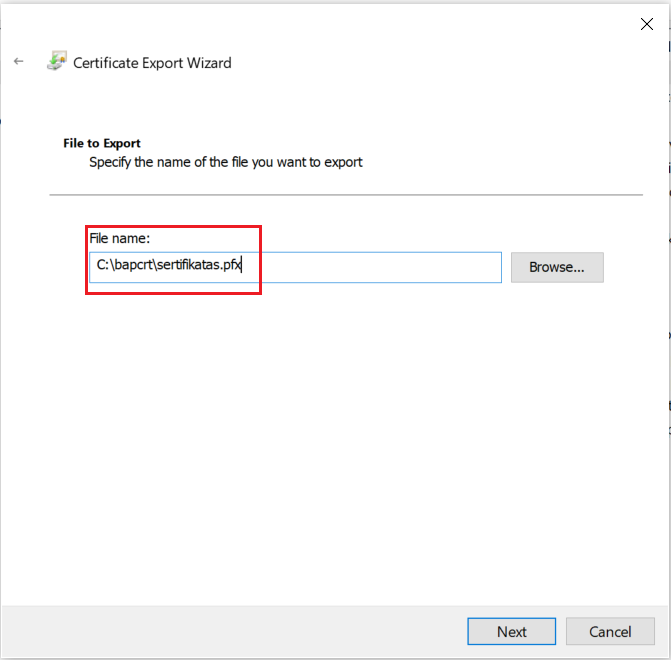
Picture 50. Certificate Export Wizard: Creating file name
13. Review the settings and complete the export operation and click "Finish".
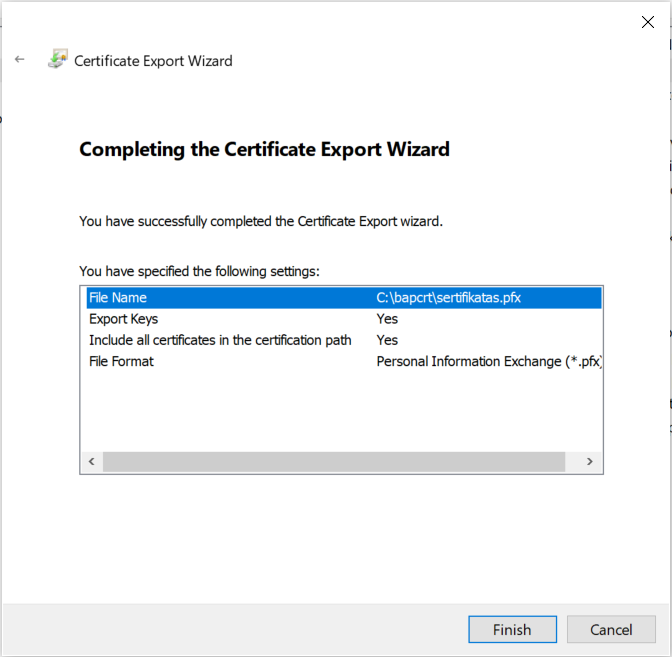
Picture 51. Certificate Export Wizard: Settings review
14. After completing this step you will be notified of successful completion of the export.
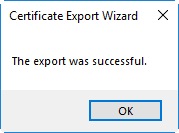
Picture 52. Certificate Export Wizard: Notification of the successful completion of a certificate export
15. . The resulting "sertifikatas.pfx" file contains your certificate and its private key. You can easily import it to another computer.
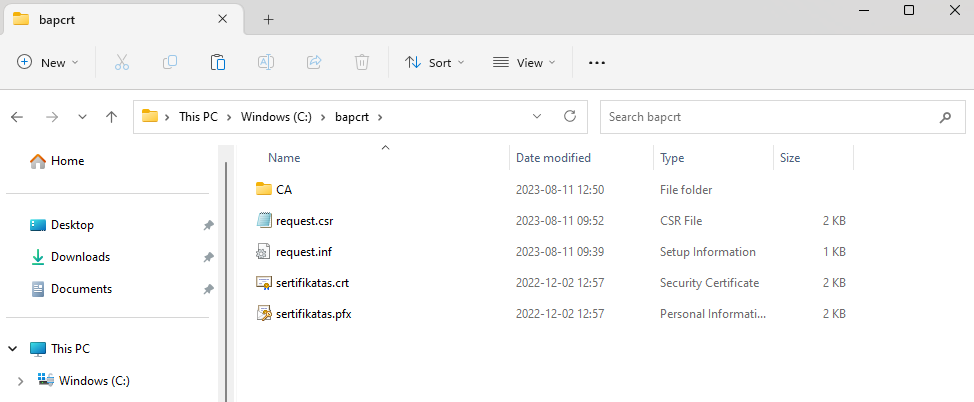
Picture 53. Display of the exported sertifikatas.pfx file